
Documentation and online training
Language
Install
Tutorials
Advanced tutorials
Need help ?

Additional features
Product Management
You have several ways to create products with e-plans.
First Method
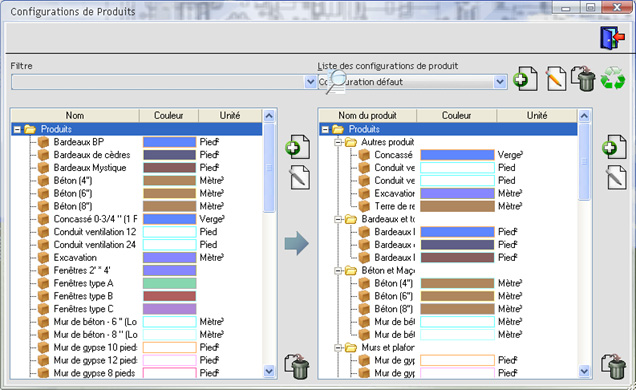
Select Defaults, Products from the menu and this window will open:
Click add a product. ![]() Enter the name, description and unit of measure for this product.
Enter the name, description and unit of measure for this product.
When you are done, press ![]() to save and close the window.
to save and close the window.
Second method
Right-click the product tab and then Add Product.
This window will open: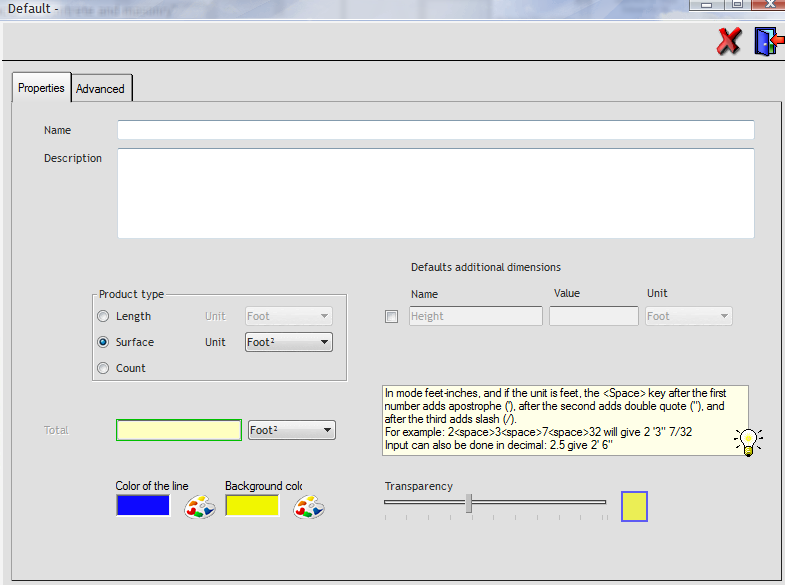
Enter the name, description and unit of measure for this product. Note that the style you assign to the products is applied to all measurements for that product, even if you had already specified a style for that measure. When you are done, press ![]() to save and close de window.
to save and close de window.
Associate a measure with a product
Right click on a measure and then "Product > Associate selection". A window containing the list of your products will open. You can select one or more products by checking the box on the left. The total will automatically update.

Associate new measurements automatically
In the bottom window, under the products tab, you will find all your products. You can display or hide these products with the eye icon. You will also find a checkbox, the latter allows you to automatically associate the next measurements with this product.

Areas
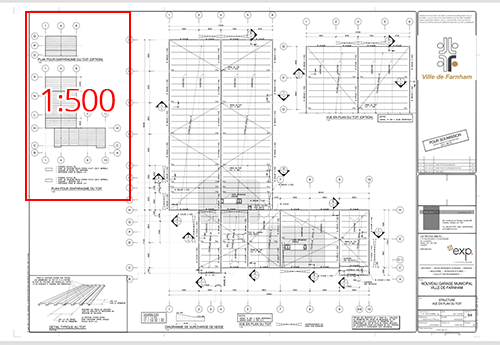
On the same plan, there may be two representations, each with its own scale. We have already determined our default scale previously (1:1501). On the other hand, in the example that follows, the area on the left is at scale 1:500. We need to create an area (represented by a red square below) at a scale of 1:500
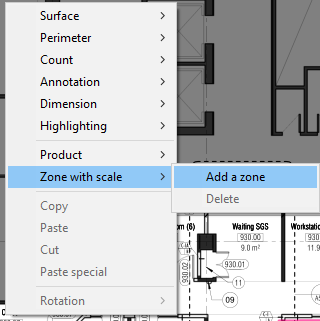
Click on the map whit the right button of the mouse and then on "Zone with scale > Create zone".
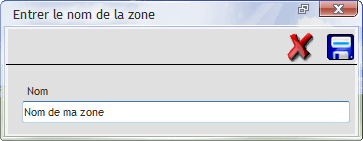
Then, draw the area on the map by clicking on the left and dragging the mouse. A window will open and ask for the name you want to give to your new zone.
To remove an area, right-click it and then "Zones > Delete".
When you move your mouse over the new area, you will see the scale cursor since it is not established. To define the scale, the steps are substantially the same as the steps above for the plans.
Display of measurements (dimensions)
As you will have notice in the examples above, the dimensions of area and area are displayed on the screen. We’ll see how to set them up.
In the menu "View > Dimensions".
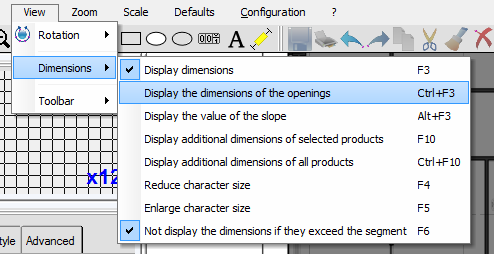
Show dimensions (F3)
Displays or hides the measurements visible on the screen.
Reduce font size (F4)/Increase font size(F5)
Allows you to reduce or enlarge the size of metric characters. If you have a lot of measurements, it’s a good idea to reduce the size of the characters to better understand them.
Handles

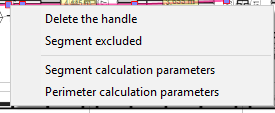
When you draw shapes, you will find handles at the ends of the latter. You can move them to change the shape area in real time by dragging them with your mouse (left click* move). You can also add or remove it by right-clicking on the box:
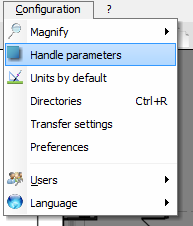
If you want to set the appearance of the handles, go to the top menu in : "Configuration > Handle parameters".
Overview of measures
At the bottom of the software you will find a table that contains all your measurements (all plans), your meters and your products (which we will see in the next chapter).
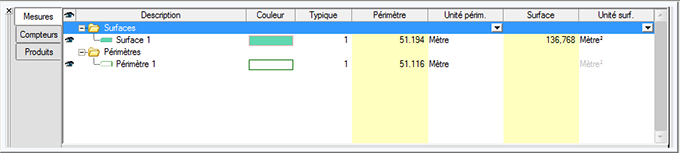
You can change the units of measurements that appear on the screen. You can also show or hide the measurement by clicking the eye icon:

Congratulations ! You have completed the support for e-plans.
You already know enough to greatly improve your productivity !